Reparing the Super Cub Battery Box
After a few solid crashes with my new RC plane, I noticed that its battery box started to come loose. It’s a HobbyZone Super Cub, and even a semi-rough landing on thick grass can cause it to come loose. Read on for pictures and an explanation of how I solved the problem.
I used cardboard, 5-minute epoxy, scissors, and a screwdriver to complete this repair job.
The Super Cub’s battery box has two parts: The white plastic lid that covers the box (and includes the battery door), and the clear plastic box that sits inside the plane’s fuselage. They are connected with 4 screws in the white lid. Start by removing these screws. Also remove the wing strut screws. Now, the white lid will come completely off the plane. The white lid does have 4 plastic posts in its corners that burrow into the foam fuselage. On my plane, 2 of the 4 posts had already broken off completely when I did the repair, but I don’t think it will cause many problems.
Note that the white lid is not the piece that holds the battery box into the plane, so don’t glue it in. Glueing in the lid will only lead to more breaks in the future.
On my plane, there wasn’t enough foam left around the battery box to work with, so I got some cardboard and started to work around the missing foam. By folding the cardboard, I was able to make some 90 degree angle braces that the battery box could be fastened to. I then glued these angle braces to the interior of the foam fuselage. This picture shows it pretty well:
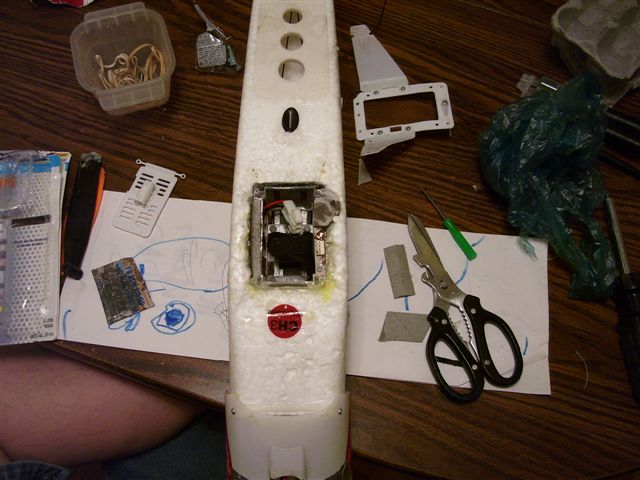
Look at the brown piece of cardboard to the left of the battery box. It is glued to the battery box and to the foam fuselage, and holds very sturdy.
I also noticed that my foam hole was really too big for the battery box, so I glued in some spacer cardboard inside the rear of the hole. To this I glued the back of the battery box for a more snug fit. You can’t really see it from the picture.
I wanted more surface area to fasten the front of the battery box to, so I cut a 4″ strip of cardboard and inserted it into the landing gear slot of the battery box, and wrapped it around the underside of the foam fuselage, like this:
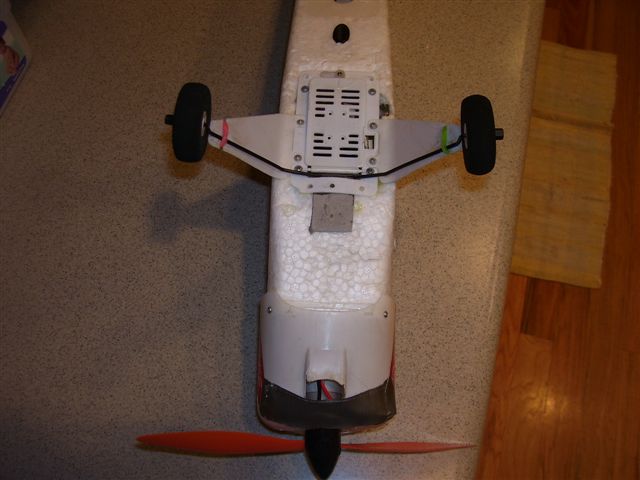
This makes it a much tighter squeeze to reinsert the landing gear wire, but it does still fit. Notice in the above photo that I have re-screwed the white lid onto the battery box. I did not use any glue to fasten the white lid to the underside of the fuselage. Instead, I glued the clear battery box to the inside of the hole inside the fuselage.
Here’s the finished product:
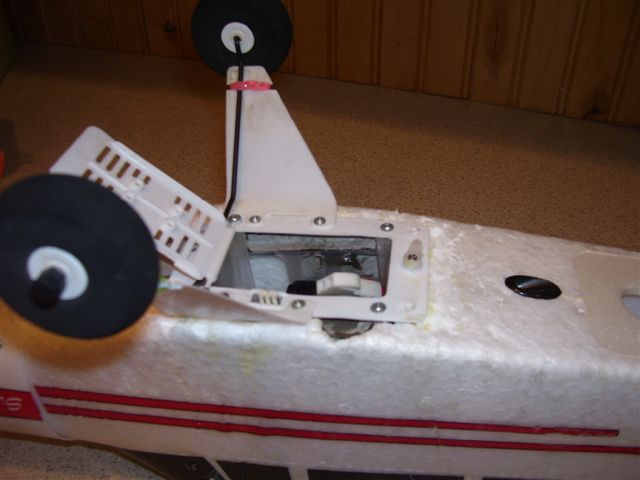
Notice that on the right-hand side (pilot’s right), there was not enough foam to work with. I cut an odd-shaped piece of cardboard to match the odd-shaped hole in the foam, and it is very strong. A better approach may be to cut out the jagged foam, and replace it with a new piece of foam, but this seems sufficient.
Now it’s extremely sturdy. I’ll be flying it tomorrow to see how it holds up.
16 comments to “Reparing the Super Cub Battery Box”
Good job. My battery box fell out after my last crash, taking some of the support foam with it, and I was wondering how to repair it. I’ll try the cardboard trick and see how it does.
The same thing happened to mine so I was looking for a good way to fix it this looks perfect.
Dave…
Maybe someone reading your blog might have an idea on a question I’m running into..?? Bought two 8 cell 9.6V battery packs for the Cub. Then read where the 12V DC peak charger would not totally charge them at the 1.2 A setting. This is the field charger that came with the Cub. Hunted around and found a field peak charger at Hobb-e-Mart that is supposed to handle everything from 5 to 10 cell packs. It was marketed for the “ParkZone” type of birds that HobbyZone sells. The Amp settings on the new charger go from .5 A to 1.8 A. The question I can’t find any info on…. what Amp setting does a 8 Cell 9.6V 1100 mAh need to peak charge..?? I’m assuming it has to be at least in the 1.4 to 1.6 A rating. But that’s just making a wild guess.
Stan,
Usually the amp setting doesn’t matter when charging a battery pack. More amps simply charges the pack faster. The important number is the voltage cut-off. When packs charge up, their voltage goes up a bit. The charger monitors that voltage to know when it is done charging. If the charger is not sensitive enough, or is hard-wired to do 8.4V (for 7 cells), then it won’t fully charge the 8 cell pack. Some chargers are smart enough to detect the starting voltage and know how many cells there are. Others have to be told with a switch by a human. Some chargers will even automatically reduce the amperage as the pack charges, so they don’t over charge it accidentally at the end of the charging process.
Someone correct me if I’m wrong, but I think the field charger that comes with the cub is just very simple and hard wired for 7-cells, so it’ll never fully charge an 8-cell pack.
–Dave
Neat job, I’ve filed it away for when that happens to my new Super Cub. May I ask, is there any danger to putting bigger battery packs in? Like a li-po 1500mah? 2500? Unfortunately I just bought 3 of the Hobbyzone 8 cells. But I’d like longer life, and maybe more power. Thanks for any comments, if this is not too old….
Jim
Definitely go for the 8-cell NiMH pack. It will make the cub fly much much better! I used the Elite 1500mah 8-cell pack from cheapbatterypacks.com, and it was fantastic.
Also, you can use li-po batteries, but you have to cut the battery box to make room for them, since they are taller. Also, there’s a jumper on the receiver box that you have to move to tell it that you are using li-po batteries so it sets the low-voltage cutoff correctly.
Good luck!
–Dave
which jumper are you talking about. i was playing with a friends cub and found that one jumper (inside one) changes to v-tail mixing and the other (outside one) i think sets higher rates on the tail controls. i hooked up a 3 cell lipo and nothing burnt out. the 3 cell sure gives this plane the life it needs be more fun to fly. we used one of my TP 1320 batts. fit right in the compartment like it was meant for it.
Honestly I’ve never payed with the jumper, so I’m not sure, and my Super Cub is only a memory, so I’m afraid I can’t be much help. I’m really just parroting what I’ve read online before about the jumper.
if cant find jumper it ok to use lipo anyways, just land when notice lack of power, because dischargeing lipo to much will ruin battery
I had the battery box fall out of my Super Cub too. Does anyone know if it makes a difference how you connect the two sensor wires (for ATC)? After switching the connections back and forth I had a hard nose first landing which means the ATC wasn’t working.
Personally I disable the ATC by unplugging the sensors completely. I found the cub flew much better without ATC. Just be sure to turn it off on your transmitter too.
I recently purchased the Super Cub as my first RC plane and love it except for the battery box as others have commented about. Someone else suggested using 2 rubberbands (looped through the battery box) and attached to the same posts that hold the top wing in place which seemed like a good idea. I took it one step further and attached a rubber band around each wheel strut (up near the fuselage) and attached the other end to the respective front posts. I tried it today without the battery box popping out and the wheel strut stayed in place. It could have been my lucky day but it is worth a try.
I couldent resist buying a Harbor Cub the other day, they had all there plane prices labeled wrong. I picked it up for 36 bucks as well as a Wild hawk, when I went to the regester the manager said the price was wrong should have ben 79 and 99 respectivly but had to sell them to me for the price as labled, needles to say I baught them both. Knowing all the lack of power issues i have heard about the SD planes I got a TP 2410-9 and a 9×6/8×8 and a 7×4 prop has anyone done a Cub with a TP 2410-9 and TP 18a ESC i’m running 7 & 8 cell minh’s . anny and all help is wanted!!!
I used Gorilla Glue….it dries like foam…now It is strog enough
Best way I have found to repair / strengthen the battery box (i have two super cubs, the original and LP…is CAREFULLY remove the very thin rear foam hatch from the underside of the fuselage that has the servo rods in it, and go to a craft store and buy some thin carbon fiber rod. cut the rod into about two 8″ lengths…and stick the rod through the foam towards the front of the plane, while ‘threading’ through the top of the battery box and into the foam at the nose of the plane, if you cut the rods long enough, there should be about 2-3 inches of rod in the foam on both sides of the battery box….with two rods, the box will not come out. At least it hasn’t for me yet. Unfortunately, I cannot post pictures due to the hungry trees eating my plane on the first flight of the year…i’m a bit rusty obviously.
I love my Super Cub (FM transmitter) that by now is more glue than foam from all the times I had to repair it.
A couple of days ago I took the plane to a close lake and wanted to fly it since it had the floats on.
Naturally as it was windy and ended up landing badly and flipping so that motor ended up in the water.
It took me a little while to recover the plane so water got inside.
After I had dried the plane I turned on the transmitter and connected the battery. All the servos work, but the motor does not.
As I had another ESC/receiver and motor I change them but had the same result.
I think is the ATC sensors that are causing the problem.
Anybody has the solution?. Can the ATC be bypassed and totally disabled?
Please help
Thanks