2nd Flight of the Super Cub
After repairing my Super Cub from my first crashes, I ventured onto the flying field again today, this time with the help of an experienced veteran flier, Michael Torrie. Thanks to Michael’s help, the experience was almost totally positive. I learned to land! I also got some much needed practice at controlling my turns, rolls, pitch, and throttle. I had a great time. Once a gust of wind threatened to crash my Super Cub into a concrete parking lot, but thanks to some tips from Mr. Torrie, I was able to recover and fly her to safety. Read on for pictures and details.
The number one best tip I got: When the plane is flying toward you, and you want to level the wings, turn the stick toward the low wing, or “stick to the low wing” as Michael would say. The other tip IÂ learned is that, unlike a car, to straighten the plane after a turn, you have to move the stick in the opposite direction for a moment. In a car, you only bring the steering wheel back to center, and you’ll be going straight again. In a plane, you have to bring the “wheel” back to center, and past it to return to straight flying.
At the end of the day, my cub only sustained two minor incidents of damage:
- A single broken prop (this time I brought 2 extras).
- The motor cover lost a chunk of plastic that was knocked loose on my maiden flight (photo below).
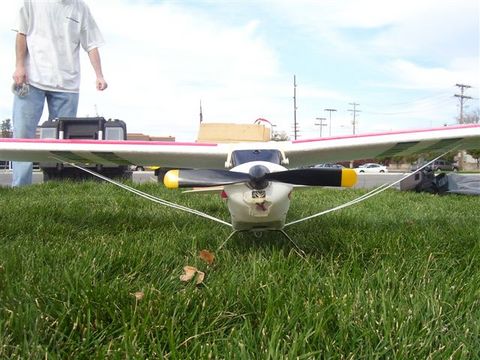
Notice the square hole just below the propeller. That’s not it. Below that, there’s an odd-shaped hole. That’s the only permanent damage sustained today. Basically, I just enlarged a hole that was already there. That goes down as success in my log.
I did want to point out something funny. I thought my plane was starting to look beat up from my many crashes, but next to Torrie’s, mine looks like it’s never been flown. Here’s Torrie’s plane:
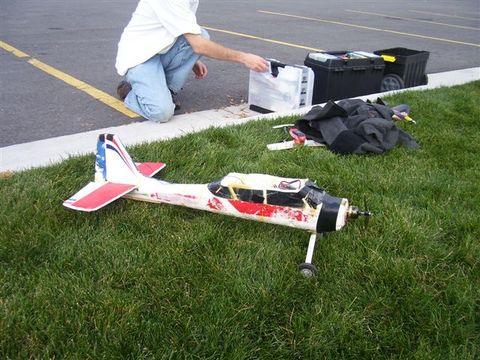
Believe it or not — this plane flies wonderfully. It’s a 4-channel with LiPo battery and brushless motor. It really sings. Unbelievable!
And now some repair notes: 5-minute epoxy (cost: $5.00) works much much better than foam-compatible CA (cost: $10.00). It doesn’t eat foam, works better than CA, and it dries in 5 minutes. I used some of Michael’s epoxy to secure my battery box after the CA wasn’t strong enough to hold it in. The brand is DevCon and it is available from Wal-Mart.
Michael also had a great idea for building “prop savers” as he calls them. He uses rubber bands and a special contraption to secure the prop to the shaft. That way, the prop can bend on impact, rather than snap. He does the same thing with his motor and gear box. I think the theory is right on: Where possible, use elastic fasteners rather than static ones to minimize the force delivered to the plane’s components on impact.
All told, it was a good day today. I had some close calls with the wind, but was able to pull out of catastrophe by applying the “stick to the low wing” principle. Saved my bacon more than once!
14 comments to “2nd Flight of the Super Cub”
Can you send or post information about how to build the elastic prop saver?
Carl, I’ll take a couple of pictures and get Dave to post them. It’s really simple, actually. Just a collar of some kind with two screws into it from opposite sides. Then the collar is attached to the prop shaft with the nuts instead of the prop. Then the prop is placed on the outside nut and elastic bands or o-rings crap around the two blades of the prop and around the two screws. For props that have the little hex indentation in the hub, the nut can actually transmit rotational force to the prop while the elastics hold the prop to the shaft. On impact the prop easily knocks loose. Rarely does this happen in the air. I set up the prop saver a bit differently for APC props, but the principle is the same. Some people call these “wobbly adapters.” Like I said, I’ll have Dave post a photo and maybe some diagrams.
Here’s an excellent write-up of the prop saver idea. My friend’s prop saver is not nearly this engineered. It’s much simpler and just sits on any shaft, without the need for micrometers and fancy tools.
http://www.webx.dk/rc/prop-saver.htm
I posted pictures of the prop saver and some explanation here:
http://thesmithfam.org/blog/2006/10/17/rc-plane-prop-saver/
I don’t have my model here but have found a supplier of prop savers – do you know how many mm the shaft is ?
My shaft for the Hobbyzone Super Cub is, I believe, 4mm, but you can easily tweak any prop saver to fit with adapter rings that come with many props. APC, to be specific, sells rings with their props to adapt to a wide variety of shaft widths. If the prop saver is too narrow, it’s pretty easy to bore it out wider with any drill. If it’s too big, just use one of the rings.
Hey Dave. You’re 100% about the 5-minute epoxy called DevCon? It does not react with the Super Cub foam, causing problems?
Thanks!
I am totally and completely sure about the epoxy. I have used it to repair lots of parts of my Super Cub plane, including the tail section, the nose, and the battery box. I even glued my wing back together after a nasty crash broke it in two pieces. It works beautifully well!
Dave..
Thanks for this Blog…!!! Just bought a HobbyZone Super Cub and was a TAD worried about the great unknown. Built and flew a Falcon 56 way back in 1972 and still have it in a box in the barn. Last flew it around 1984 and have not even unpacked it since a move about 9 years ago. Still have an old Kraft 4 channel (only used 3 channels in the Falcon) and it’s still around here somewhere. But… the electric stuff out today really tweaked my curiosity and I wanted to try one out. Seemed like the Super Cub was the way to go since I might as well be a newbie after all these years.. and what research I could find up here had nothing but good praise on this particular bird. And finding your Blog helped my mental condition a great deal..!!
Since I live just outside of OKC… we get about two days of “non-windy” a year… so it might be awhile before I can get airborne (whenever the plane finally arrives). Plus… I will have to find a decent field somewhere around here since my property is nothing but plane eating trees all around me.
Only thing that has me mainly worried… is your comment on the speed of the Cub. As per building plans on my old Falcon 56, they recommended going with a Fox 19 gas engine. Short version of this story… the Fox 19 on a 56″ wing span bird… was almost NOT enough engine to get airborne from ground take-offs. But, once in the sky, it was nice slow plane that gave me time to adjust “mentally” when I got into trouble. And I needed a LOT of that “forgive” time during some flights in those days.
Once again… Thanks for taking the time to put this Blog together so ol’ timers like me can read about “how to do it” again. And especially covering the exact plane I just ordered. Now I just need a good local resource for extra props that I’m sure I will need..!!!
-Stan
Stan,
Good luck with your Cub! Now that I’ve been flying it for about 4 months, it doesn’t seem nearly so fast. In fact, it seems down right slow, especially with an 11×8 prop on it.
I went out in the snow today with zero wind. The snow was hard so landings and take-offs were smooth on my new Dubro snow skis. It was great.
I’ve let about 5 novice fliers fly my plane around and not a single one has crashed it yet (other than one landing attempt by a beginner). Today, I let a first-time flyer take the controls at about 150 feet. He did great, even flew a couple loops.
Can’t wait to hear back about your Cub experiences with electric R/C flight!
–Dave
Great blog!
I’m thinking more and more about getting a Super Cub. I bought a Firebird Commander 2 last week and managed to break into several pieces (yup, wing and tailboom snapped) after an incredible half hour long flight in brisk winds. So I reckon I could have even more fun in a 4ch plane like the cub if I could fly it back to me against the wind.
As a long-term power kiter I find it hard taking up this park-flying hobby where I ideally need to fly in almost zero wind. ;)
Happy flights
.
Rob, just FYI, the Super Cub is 3 channels out of the box. I did, however, modify it to be 4 channels. Details here:
http://thesmithfam.org/blog/2007/03/01/super-cub-aileron-upgrade-part-1/
hey i have had a super cub for a month or so and i want to make the lipo battery upgrade. could anyone tell me what changes i need to make to my plane if any to be compatable with lipo batteries?
It’s very simple to make your Super Cub fly with LiPo batteries. There’s a jumper on the receiver that you have to move, and you’re all set. This just makes the low battery mode work properly (LiPo batteries have a different low voltage level than NiMh batteries), so that the motor shuts off when the batteries are low. If you let LiPos get too low, they can be damaged.
Of course you’ll need a special LiPo charger as well.
–Dave